Thursday, April 28, 2011

The Canon Powershot G12 and Macro Photography

Now that Spring's here I've been taking a lot of pictures of flowers. (My previous posts related to this can be found here and here.)

Next up, and still related to flower photography, I wanted to try the Macro capability of the G12So, while walking with the wife (@pinayobserver) one beautiful sunny afternoon, I took more photos of Spring colors.

I was greatly surprised by the capability of the G12 as a Macro camera. I was able to shoot the flowers with only about a half-inch distance between the front of the lens and my subjects. And since the flowers are in the shade, the proximity of the camera to the subjects did not cause any shadows on the flowers.

I shot these pictures in Manual Mode so I was able to control both the aperture and the shutter speed. With the picture on the right at the top-most row, I sprinkled the flower with some water to make it look like there is mist on it. The photos are sharp and could really pass for a true macro shot. With the correct white balance, the G12 was able to reproduce the beautiful colors of Spring.


However, not everything smelled like roses (no pun intended).

One problem that I came across with is the difficulty of manually focusing the G12. There were times when the camera focused on something behind the flower; this prompted me to use Manual focusing which, as I've said, proved to be not as easy as it seemed.

Also, since I was hand-holding the camera, I couldn't use a narrow aperture so as to get the most depth-of-field. And lastly, since I was shooting outdoors, I need to boost the ISO so that I will have a fast shutter speed (the wind was causing the flowers to sway). This caused some noise to appear in the shots. However, the noise are only discernible when the photos are magnified to 100%. (Yes. the G12 is really good at handling noise at ISO1600 or less.)


The only post processing done on the photos are:
  1. corrected white balance,
  2. cropping, and
  3. noise reduction.
So, before the time I finally get to own a true Macro lens, the G12 would tide me over.

Adobe Photoshop Lightroom was used in post.
--------------------------------
All photos were made using the Canon Powershot G12. My review of the G12 can be found here. My review of the perfect bag for the G12, the BlackRapid SNapR can be found here.

Monday, April 25, 2011

How to Shoot Flowers - Part 2

In a previous post, I said that there are two techniques that can greatly improve your flower photography. Since flowers are growing everywhere because, well, it's Spring time, let me add another to my previous list.


It's often been said that the best time to make pictures of landscapes is during the Golden Hour. It's also been said that one should not make portraits with people facing the sun because it'll make your subjects squint - not very nice.


In this light (no pun intended), I believe that, when it comes to flower photography, some lighting situations are also better than others.


Let me show you.


When you take flower photos under direct sunlight, shadows will obviously be in the shot. The shadows won't add anything to the shot.


So, the best solution is to make the photograph when the flowers is in the shade. This will make the light on the flower nice and even. Can't find a flower in a shaded area? Well, you, as in your body, hat, or jacket, can be used to put the flower in the shade. You will also need to put your camera on Spot Metering so you can be sure that the camera will meter on the flower and not the entire scene.


Want another technique? Why don't you use a diffuser, like the photobasics.net by Westcott; yes, the one that's also used to reduce the light for portraiture.


However, blocking the light falling on the flower can cause complications. When you use, say your hat, to block the light, there will be a great contrast in the light falling on the flower and the light falling on the background: the background can be greatly overexposed.

So, the best solution really, for me, is to wait until the flower, and its background, is in the shade. Hey, if you have the patience to wait for the golden hour for your landscape photography, then I think you'll have the patience for waiting for the perfect light for your flower photography.


--------------------------------
Shots made with a Canon 5D Mark II and a Canon EF 24-105 f/4L lens. Want a nice photography bag for your DSLR? Check out my review of the Lowepro Slingshot 202 here.

Wednesday, April 20, 2011

How to Shoot Flowers - Part 1

Temperature's rising, birds are back from the south, leaves are growing on trees, and flowers are in bloom.


Yes, Spring has truly arrived.


And if you were worried about bringing out your camera into freezing temperatures of the outdoors, now's the perfect time to whip out your DSLR or point-and-shoot.


And if you are new to photography, then I have a couple of pieces of advice when you want to shoot flowers: get really, really low and get really, really close.


You see, most people shoot flowers standing up. So, majority of photos of flowers you will see are shot with the photographer lording over the flowers. There's really nothing wrong with that but sometimes it's really hard to see what your photographing.


Look at the picture below:


It can use a lot of improvement...


One solution is to isolate your subject:


But, still, you could do some more...

So, the next step is to get close.


Now we are getting somewhere. We were able to eliminate most of the negative space and we have clearly defined our subject, though the white blooms below are competing for our attention.


So, the next technique to use is to get really low. Why? If you get low, then you will produce a picture of a flower that is not always seen: you don't see a lot of people lying on the grass to look at flowers, right? But also, flowers look really nice when it's in a vase on a table, right?


Why?


Because flowers look nice when viewed from the side.


And the flowers behind the subject are out of focus so we can definitely tell that they are just the backdrop to the main subject.


[April 25 - Title updated to Part 1 to give way to Part 2. Part 2 can be found here.]


---------------------------------------------


Shots made with a Canon 5D Mark II and a Canon EF 24-105 f/4L lens. Want a nice photography bag for your DSLR? Check out my review of the Lowepro Slingshot 202 here.

Monday, April 18, 2011

Good Start to the Spring Season

I just met with the surgeon and he said he sees great improvement in the range of motion on my left shoulder. I attribute my improvement to my therapist, Kim, of course. The surgeon said that I should just continue with my therapy and I'll feel much better in due time.


I'm also glad that the mercury is now rising. (The element, not the planet...) The cold weather was really bad for my shoulder so I'm glad that warmer days are coming.


And what comes with warmer weather? Spring blooms. As you can see, my shoulder is feeling good enough that I can shoot with my 5DII to make this photo.


I'm really happy about the progress my shoulder is taking. I hope to get back a lot sooner to do what I love to do most: make pictures and, hopefully, some of them would be great. ☺


------------------------------
Want the best bag for your Canon 5D Mark II? Check out my review of the Lowepro Slingshot 202AW here.

Wednesday, April 13, 2011

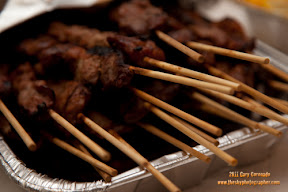
There's Always A Shot... Filipino Barbeque

When the wife (@pinayobserver) and I left the Philippines so she can pursue her academic dreams, one of the first thing that I missed from the land of my birth was the food.


So, whenever there's a reason, the wife and I buy food from Filipino restaurants near our place. And Filipinos always find a reason for, I believe, we like to just gather together and just plain eat. :) So, when some friends went to the house to celebrate the wife's birthday, we bought, among other things, this pork barbeque, Filipino Style. It was very tasty and brought back memories of home.


From There's Always A Shot


I did not want to waste my chance so, before our visitors arrived, I made a picture off of it for I know this entrée won't last long. :)


-----------------------------------
Photo made with a Canon 5D Mark II kit with a Canon Speedlite. The light was bounced from the ceiling. Settings are at f/4, 1/50s, ISO200 at Manual Exposure.

Tuesday, April 12, 2011

Always Look for a Better Shot

While I am sitting outdoors, enjoying the Spring sun this corner of the Atlantic, I remembered a photographic advice about lighting and portrait photography: side-lighting is best because shadows define the face and gives it dimensionality. And when you decide to use a speedlite, the first advice you'll get is get it off-camera.


But what do you do if you arrive at a place and the lighting isn't ideal? Waste the two-hour drive and curse Mother Nature? Or make the most out of it by trying something else?


This was what I did when some friends and I went to Atlantic City, NJ. It was a particularly overcast day and the light was really flat. But instead of sulking, I reduced my shutter speed and produced, for me, a compelling photo. The blurred image of the other tourists added a point of interest to the otherwise drab photo.


From People and Portraits


The light may be flat but at least I was able to add something that would make the photo more interesting. And my subject of course also made it interesting by having a connection with the camera.


It was a gloomy day but I was happy with the photo that I was able to produce.


-----------------------------


This shot was made using a Canon 7D with a Canon EF-S 17-85 f/4-5.6 IS USM lens. Settings are f/4.5, 1/5s at ISO500.

Wednesday, April 6, 2011

Shoot the In-Between, A Portrait Photography How-to

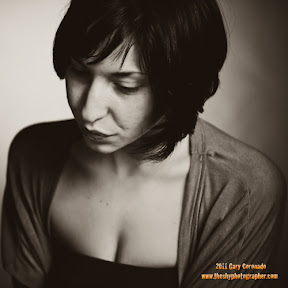
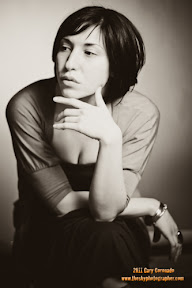
My photography teacher over the winter, Peter C. Cook, told us, his students, that some of the best photos are those that were taken when the model least expected it. He said that the model can go “stiff after some time, especially when your model gets tired. When such a thing happens, the photos that will come out won't be as good.


So, as Peter told us, have a break, speak with the model, establish a rapport. And while relaxing you will still be able to get some awesome shots. This was proven here with our model Rebecca.

        
From People and Portraits
  
From People and Portraits
  
From People and Portraits
 
From People and Portraits

So, don't just get directed and choreographed photos of your model. Also shoot the in-between.

----------------------------------
Shots made with the Canon 7D with the Canon 50mm f/1.8 lens.

Monday, April 4, 2011

Review of the Lowepro Slingshot 202 - the Best Mid-Sized Camera Sling Bag

Before my surgery, I was able to acquire a Lowepro Slingshot 202. I'm quite happy with the Lowepro Fastpack 250 but I needed an alternative for those times when I don't have my MacBook Pro with me. I needed something smaller but is still big enough to suit my needs.

What are my needs? Well, basically I want a camera bag that is more comfortable than a shoulder bag but still has the easy-access feature a shoulder bag brings. The side access of the Fastpack 250 solved this but, as I've said, I needed something smaller but can still accommodate my Canon DSLR, a spare lens and a speedlite, at the least.

So, I looked for a backpack that could satisfy my requirement. However, I couldn't seem to find one that suited my needs. Why? I'll explain below. So, I next looked at sling bags.

My first choice right off the bat was the Slingshot 202. The only thing that caused doubts in my mind was actually the size of the bag - ironic, I know, since I wanted a smaller bag. But, I wanted something that can fit more than my camera gear - being a bookworm, I also wanted to bring at least one book with me when I go out. (I don't know why camera bags don't have this "feature". At the least, photographers would sometimes want to bring a photography book, magazine or maps, right?) The good news is, my friend's first generation iPad, with case, was able to fit into the camera compartment. That was the sign that I really made the right choice - if you can put in an iPad, you definitely could put in at least one book, albeit not an encyclopedia...


The compartment on top is big enough to fit a DVD case. This is good news for me for the Kindle and its case is of such a size. So, I can put the Kindle in its case, Seth Godin's latest book Poke the Box and my Lumiquest 80-20 kit in there at the same time! It even is big enough to house two speedlites or my Canon 7D with a Canon EF 50mm f/1.8 lens.


I won't say much about the capacity of the camera compartment for I will just let the photos do the talking for me. One thing I'll say though - I'm quite surprised with what I was able to put in!


A Canon 7D with a Canon EF 70-300mm f/4-5.6 lens attached? Wow!

There are a lot of small bonuses that came with the bag, like CF pockets that are easy to access as well as meshed pockets inside where you can put cables, filters, lens caps, etc. You can put a small tripod or a monopod on the side of the bag. There is also an all-weather cover that slips conveniently into a hidden pocket in the bag.
As I've said, I was able to enjoy this bag before I had my surgery. Getting the camera was a breeze because of the quick side access. When you swing the bag to the front, the zippered opening is "on top" so your gear won't fall off. Also, I can actually fit my Canon 5D Mark II with Canon EF 24-105 f/4L lens with the lens hood in the ready position which made it a lot easier to get "that" shot.
I was able to walk for a couple of hours around Princeton, NJ and the bag is comfortable to use. I was even able to do the groceries, with the wife, with it! The bag is really comfortable when it contains my basic photography needs (plus the Kindle).
The Lowepro Slingshot 202 is really a very good bag.
I only have three requests for Lowepro to really make this a great bag:
  1. I wish that the solitary strap is heftier. You can't go wrong with a strap with a thick padding. It also becomes a little more uncomfortable when I have two camera bodies inside, though I don't know if Lowepro really designed it to hold that much. What is, for me, the best strap for a bag? See number 2.
  2. Put grooves on the back to allow air to flow. The Ecogear bag that I won from Engadget, the first Rhino version, has the best "back" for a backpack for my taste. The Slingshot 202 is a slim bag but with the arrival of Spring and Summer, I don't know if my back would be able to "breathe" with this.
  3. What about an additional side-access compartment, like with that for the Lowepro Fastpack 250, for things like an iPad or a book like David Duchemin's Within the Frame?
Or what about a two-strapped version of the 202 making it a full-pledged backpack? All the backpacks that I researched before I got the 202 that is capable of carrying a laptop are all huge: all are capable of carrying "laptops with screens up to 17 inches". I don't know about you, dear readers, but I just want to bring a "gadget" with an 11-inch screen. When I get to own one... Two strap version? My shoulders would praise you to high-heavens dearest people at Lowepro. :)


But, the Lowepro Slingshot 202, itself, is a very good quality bag. It is Highly Recommended.


-------------------------------
All photos made with the Canon Powershot G12. My review of the G12 and the perfect bag for it can be found here and here, respectively.

Labels

Photography Chicago There's Always A Shot Review Philippines Gadgets Outdoor Photography Accesories Metro Manila Street Photography Events Photography Inspiration Photo Journalism Summer Photography Advice Travel Winter Accessories Photography How-to Portraiture The Wife Apple Autumn Shot A Million Times iPhone Video Review Product Review Holidays Long Exposure Spring Architecture Princeton iPhone Accessories Inspiration Taguig Art Indoor Music iPod Canon Cameras Event Fireworks Photography Technique Photojournalism How-to Museum Product Photography Books Fine Art Fitness Health Personal iPhone photography Flowers Fujifilm Panorama iPhone Photo Blue Hour #MoreFunInThePhilippines Food Photography Landscapes Lenses Filipino Fujinon Launch Mac Shoes Sony California HDR Japan Makati City Musings Navy Pier Night Photography Photoshop Science iPad Android BGC Bags Blog Contest Family Fashion Fitbit Friends Internet Motion Blur Non-iPhone phone Road Trip Running Sunset USA iPad Accessories iPhone Apps Animated GIF Apple Accessories Battery Bluetooth Cebu Cycling Dance Earphones Food Garmin GoPro Gym Home Luzon Macro Natural Light Photography Outdoor Run Pageantry Parade Quantified Self Quezon City Smartphone Sports Tabletop Photography Time Lapse Video Videography Workout iOS 4K Advice Anime Animé App Review Apple Watch Architectures Asia Athletics Beach City Scape Cosplay Dining Drop-proof case Duathlon Editorial Emotion Flower Globe GoProMax HD Halloween Holy Sites Home Theater Hyperlapse Joby Laptop Accessories Learning Long Zoom Love Lowepro MacBook Manga Manila Milky Way Mind Museum Minnesota Mobile Phone Mobile Phone Photography Movies North Luzon Orange PSHS Pasay City People Photography Event Post-Processing Power Rain Requests SM MoA Samsung Satire Sound Speakers TPLEX Tagaytay Tanay Televisions Temples There is always a shot Walking Workshop iPhone Case iPhone Xs Max

Comment Guidelines

Keep all comments relevant to the original post. Do not post comments which contain profanity, hate speeches or solicitations of any kind. Posting comments to this blog constitutes your agreement to adhere to these guidelines.